Kubernetes basics in 5 minutes
Simple guide for getting into kubernetes

What is Kubernetes
Kubernetes is container orchestration engine. Main purpose of kubernetes is to manage container deployments. At present, all applications are adapting Microservices architecture over Monolithic architecture. And a way to approach microservices architecture is through containerization technology. As we know, Docker revolutionized container technology. All the developers are using containers to build their applications. So, to manage those containers at a large scale, we use kubernetes.
Kubernetes was originally designed by Google and is now maintained by the Cloud Native Computing Foundation.
Major jobs of Kubernetes
- Scaling deployments
- Load balancing
- Monitoring
- Automated roll-outs and rollbacks
Ways to practice Kubernetes
- In cloud, GKE(Google Kubernetes Engine) in google cloud.
- Minikube :- To install Click here
- Play with Kubernetes
I am using Minikube. Its easy to setup minikube in your laptop.
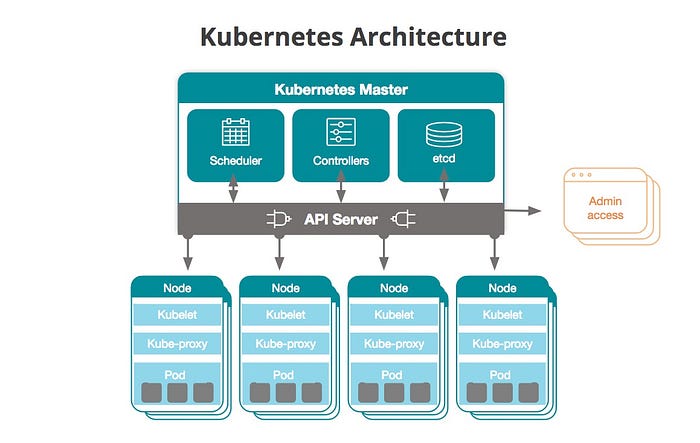
Structure of Kubernetes
Kubernetes creates a cluster. A cluster contains two types of components:-
- Master Node
- Worker Nodes
We deploy our applications in worker nodes. Deployments in worker nodes are controlled by Master node.
kubectl command
It is a CLI command used for controlling clusters. We can interact with cluster using this command.
What are Nodes and Pods?
Nodes are nothing but compute instances.These compute instances contains pods.
Pods are considered as basic execution unit in a kubernetes cluster. Pods contain containers in which application runs. A node can have multiple pods and a pod can have multiple containers. But we generally run only one container in a pod.
So basically, kubernetes job is to manage pods. We can control pods with kubectl command.
Creating pods
There are two ways to create anything in kubernetes. They are by using kubectl commands and by using yaml files.
For example, to create a pod running httpd container using kubectl, the command is
kubectl run <podname> --image=httpdThe same can be done with YAML file
apiVersion: v1
kind: Pod
metadata:
  name: mypod1
spec:
  containers:
  - name: httpd
    image: httpd
Save the file with any name. Here i saved it as pod.yaml. To run file, we use command
kubectl create -f pod.yamlWith this, we can create a pod which runs httpd container inside it.
Now lets talk about Master Node configuration.
NOTE: Master node is often referred as Master and other nodes are referred as worker nodes or simply nodes.
Master Node
Master node consists of many components.Master node is also called as control plane. They are
- kube-api-server
- kube-controller
- kube-scheduler
- etcd
- cloud-controller
kube-api-server
It is the main component in master node. This component is connected to other components in master. kube-api-server listens to kubectl commands and then it passess it to the required component.
kube-scheduler
This component is responsible for deployments of pods. It schedules the deployment of pods in nodes.
kube-controller
It’s basic functionality is to monitor pod. There are many controllers in it like node-controller to control number of node, replication-controller to maintain required replicas of pods.
etcd
It is a storage service. It contains all meta-data of the cluster. It can act like a backup store of the cluster data.
cloud-controller
It interacts with the cloud and inherits their specific functionality. The cloud controller manager lets you link your cluster into your cloud provider’s API and lets you manage your cluster from cloud.
Worker Node Components
- kubelet
- kube-proxy
kubelet
To run a pod, we need kubelet installed in a node. kubelet launches and maintains pods in a node.
kube-proxy
It is reponsible for networking among pods in a node. Its main functionality is to provide load-balancing to pods
As we know the details of master and worker nodes, we learn about types of objects that are deployed on nodes.
Kubernetes objects
Types of kubernetes objects
- Replication Controllers
- ReplicaSets
- Deployments
- StatefulSets
- DaemonSets
- Jobs
Replication controllers
It manages the number of pods in a node. If a pod goes down, replication controller creates another pod.It uses labels to detect pods.They are no longer preferred. Instead Replicasets are used.
ReplicaSets
They are modified version of Replication controllers. They use set properties to select pods whereas replication controllers use equality property. We can write expressions using set properties which are more elastic and convenient. So replicasets are used.
Deployments
Deployments use replicasets. Along with that, it has many other features. They are responsible for rollouts and rollbacks. They maintain versioning system.
StatefulSets
If you need to deploy applications that maintain local state, StatefulSet is a better option. StatefulSet have unique persistent identities with stable network identity and persistent disk storage.
DaemonSets
If you need to run certain Pods on all the nodes within the cluster or on a selection of nodes, use DaemonSet. DaemonSet ensures that a specific Pod is always running on all or some subset of the nodes.
Jobs
The Job controller creates one or more Pods required to run a task. When the task is completed, Job will then terminate all those Pods. Also we have a CronJob, which runs Pods on a time-based schedule.
Among all objects, most used is deployment object. Here is a simple YAML file for deployment object.
apiVersion: apps/v1
kind: Deploymentmetadata:
  name: httpd
  labels:
    dc: IN
    env: devspec:
  replicas: 3
  selector:
    matchLabels:
      env: dev
  template:
    metadata:
      name: pod1
      labels:
        env: dev
    spec:
      containers:
      - name: mycon1
        image: httpd
        ports:
        - containerPort: 80
Lets save it as web.yaml. To create file, we use the command
kubectl apply -f web.yaml- kubectl create => creates a pod
- kubectl apply => creates a pod if not present and updates a pod if already created.
These are kubernetes objects used for deployment of pods on a node.
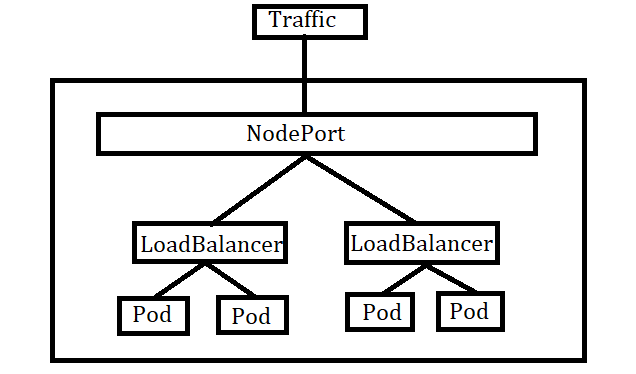
Service in kubernetes
We use service for networking in kubernetes. There are three types of services. They are
- ClusterIp
- NodePort
- LoadBalancer
LoadBalancer
It is a service used to connect all pods within a node. It distributes traffic among pods in a node.It selects pods with labels. So, if we add a new pod with same label, it automatically comes under loadbalancer service.
ClusterIP
It is a default kubernetes service. We use this service to connect all pods within a cluster. It can be accessed using kube-proxy.
NodePort
This service opens up node to external clients.It open a specific port for a node and sends all traffic to service(LoadBalancer) in the node. You can only use ports 30000–32767.
You can create a service using a file or kubectl expose command.
kubectl common commands
- kubectl get
- kubectl create
- kubectl describe
Example
kubectl get pods
kubectl get deployments
kubectl get serviceskubectl describe pods <podname> -o=wide
kubectl get pods <podname> -o=yaml
kubectl describe services
ClickHere for kubectl cheatsheet.
If you like my article, please share it. 💖