MLOps 101: Data Versioning Using DVC

DVC, which stands for Data Version Control, is an open-source tool that is used to version control data and machine learning models. It’s designed to handle large files, data sets, machine learning models, and metrics as well as code. It’s built to make ML models shareable and reproducible. DVC is designed to work with Git, but it overcomes some of the limitations of Git in handling large files.
Here are a few reasons why you would want to use DVC:
1. Data versioning: Git is not designed to handle large files or binary files effectively. DVC allows you to version control your data and models in a similar way as you do with your code in Git, but without straining your Git repository.
2. Data and model sharing: DVC integrates with remote storage (S3, GCS, Azure, SSH, HDFS, HTTP, and others) in a way that you can push and pull your data and models as easily as you would do with your code using Git.
3. Reproducibility: DVC tracks all the steps in your data processing and machine learning pipeline. This makes your projects reproducible. You can easily go back to any version of your project, with matching data, model, and code.
4. Collaboration and sharing: DVC makes it easier for data scientists to collaborate on projects. Different team members can work on their own experiments and then merge the changes in a controlled and systematic way.
5. Metrics tracking: DVC has built-in functions for visualizing and comparing metrics across different versions of a project. This is especially useful in machine learning projects where you want to track model performance.
In summary, DVC brings to data science and machine learning projects the same kind of versioning and collaboration features that Git brings to software development. It’s a tool that’s designed to handle the specific needs of data science and machine learning teams.
In this article we are going to learn how to pull and push your data on git using DVC. Before starting I am asuming you are familiar with Github and Git and already have Git setup on your device. Let’s Begin.
Step 1: Installing DVC
Before starting, make sure you have DVC installed. If not, you can install it by running the following command in your terminal:
pip install dvcStep 2: Setting up repositories
Next go to your Github and create a repo “Data-Versioning-Using-DVC”.

Afterwards create 2 Folders named “DVC_Push” and “DVC_Pull”. We are going DVC_Push to push our data file to the git repo and DVC_Pull to pull the file from git repo.

Next go to your Google drive, Create an empty folder called “My_Data” and get the link to the folder and save it.

Step 3: Initialize DVC in your project
Navigate to your project directory (DVC_Push ) via the command line and initialize git and DVC.
cd C:\Users\path\to\repo\DVC\DVC_Push
git init
dvc init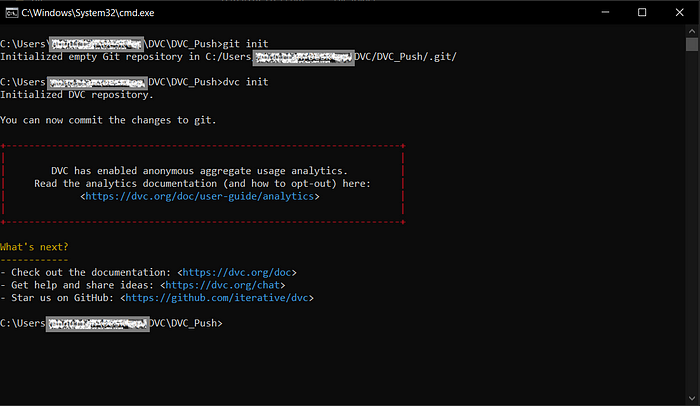
Step 4: Connect your local repository to your GitHub repository
Add your GitHub repository as a remote:
git remote add origin https://github.com/your-repo.git
Step 5: Configure DVC to use Google Drive as remote storage
dvc remote add -d myremote gdrive:your-drive-linkThis will set Google Drive as your default DVC remote. The -d flag sets it as the default remote. The gdrive:// URL is your Google Drive directory where you want to store your DVC-tracked files.

Step 6: Add your data file to DVC
Put the data you want to add to DVC to your DVC_Push folder.

dvc add data.csvThis creates a new file named data.csv.dvc that tracks your data file.


Step 7: Commit your changes to Git
git add data.csv.dvc .gitignore
git commit -m "Add data file to DVC"
Step 8: Push your data to the DVC remote
dvc push
This will redirect you to google login and will ask you for permission. Grant DVC permission to access your Google drive and make changes to the file.

Step 8: Push your changes to the GitHub repository
git push -u origin master

Now, your data file is stored in your Google Drive folder, and the DVC metadata is stored in your GitHub repository.
Step 9: Pull the data to your DVC_Pull directory
git clone https://github.com/your-github-repo.git
cd Data-Versioning-Using-DVC
Then, pull the data from the DVC remote:
dvc pullIn case you encounter the following error:

One of the possible reasons is that your remote storage is not setup properly.
In the DVC_Pull directory write the following command in the terminal:
dvc remote list
And if this shows up empty, go to your DVC_Push repo and write the following commands in the terminal:
git add .dvc/config
git commit -m "Add DVC remote configuration"
git push
And now go back to your DVC_Pull directory and write the command:
git pullYou’ll now have the updated repository.
Write dvc remote list to check if there are any remote storages showing up, hopefully this’ll resolve your error.

Once a remote storage shows up, write the following command in the DVC_Pull directory terminal:
dvc pull

As you can see in the directory above, the data file has been successfully pulled from the remote storage google drive.
Congratulations you have successfully used DVC to push and pull your data from remote storage setup on Google Storage.
That’s all Folks. May the force be with you.