PayPal Integration with Spring Boot
Nowadays, many people are interacting with one of the kinds of payment gateways for making payments. Whether we are shopping or paying bills over the wire, there is always some or the other kind of payment gateway involved. As full-stack developers or backend developers, we always wonder how we can integrate a payment gateway with our applications. This post will help you get started with it.
The TODO List:
· Create a PayPal Developer account
· Create a test application
· Create some test users with email/password, credit card details, etc for testing out the payment.
· Explain how PayPal API works.
· Create a Spring MVC application
· Follow XP techniques to implement and test the integration.
So, without wasting any time let’s get started.
Creating a PayPal Developer account:
Creating a developer account with PayPal is really easy. All we have to do is provide an email and a password to get started. Visit the PayPal Developer website and click on Log into Dashboard. You can click on the “Sign Up” button. Key think to create a hassle-free developer account is to not change the country from “United States” and simply provide the email and password.
Once you log in with your newly created credentials, you will be redirected to the developer dashboard. This is the area where we as a developer get to play with different things.
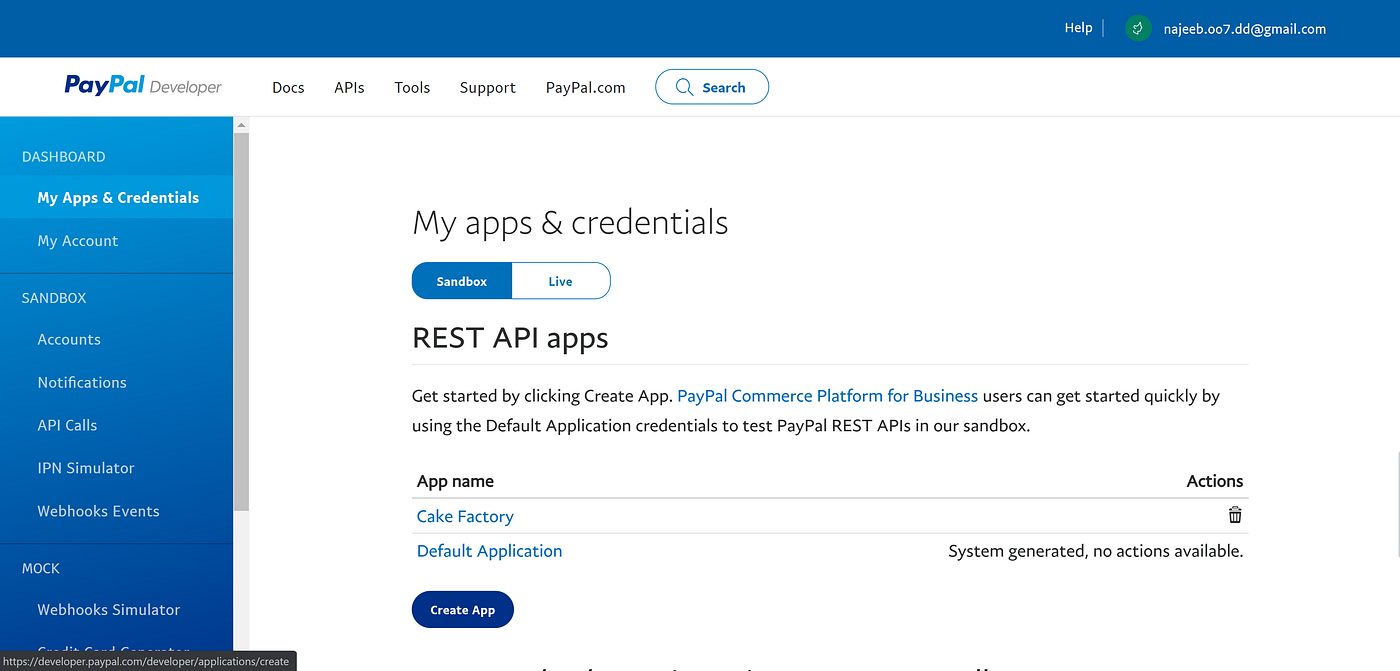
This is how generally the developer dashboard will look like. On the main content area, we can see we have the option to create an app which could interact with PayPal APIs. On the left-hand side, we can see that we have bunch of other options. Important option from there is the “SANDBOX” -> “Accounts” section which lets us create test users with autogenerated mock data.
Click on the “Create App” button to create an app. Give a name and select the Merchant Option which allows the app to accept payments.

Once the app is created you will be presented with a page which will contain the client id and client secret of your application. Note it down. We will use these credentials to connect to PayPal from our application. Remember secret is hidden by default. You will have to click on the show link to make the client secret appear on the page. Once the application is created lets create some test users to initiate the payment.
Creating Sandbox Test Accounts
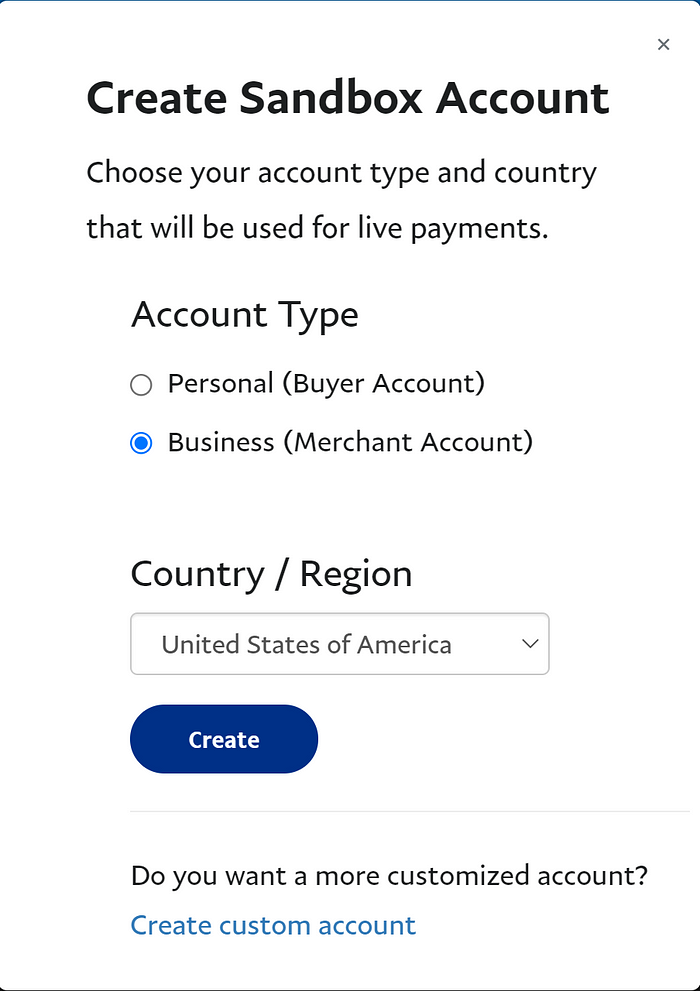
Lets navigate to the “SANDBOX” -> “Accounts” tab.

This is the area where we can create test accounts with auto generated mock data. These accounts will act like real users who will be making payment via your application. Let’s click on the “Create Account” button and select the account type as Business. Leave the country/region as it is and then click on create.
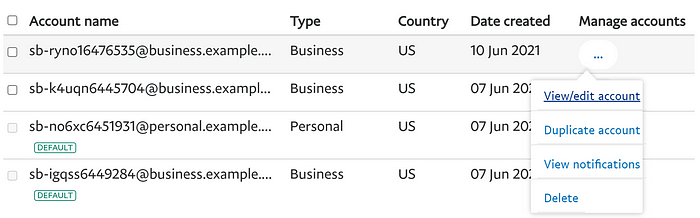
Once the account gets created you can manage your accounts.
Click on the “View/edit account” option from the manage accounts section.
You will get the details of the test user created like First and Last name, email address, a system generated password along with other details in the “Profile” tab. You can switch tab to “Funding” to find the details of the mock credit card details which was generated for you along with a test account balance. Make a note of the user credentials which we will be using for our testing (usually the email and password do, but you can also use the credit card information).
These are things which we will need in our application to facilitate a payment option. Time to start with our Simple Spring MVC application.
Before we start with the actual application, I wanted to give a heads up that we interact with PayPal servers using Rest APIs. Therefore, we could always create our own implementation from scratch and initiate the payment. But that process is too cumbersome and because of this PayPal provides us SDKs to easily and quickly get started with the integration. The use of PayPal SDK makes our life easier so we will use that.
PayPal Checkout
PayPal provides a product “PayPal Checkout” which is built on top of PayPal APIs for integrating their payment services with your application. Before we begin with the actual coding let’s see how the PayPal checkout workflow will be in a very generic case:
Customer places order: The customer clicks/taps the Check out with PayPal button.
Customer is redirected to PayPal site: The customer is redirected to the PayPal site to complete the transaction.
Customer logs in to their PayPal account: The customer must log in to their PayPal account to complete the transaction. The payment system uses the billing and shipping information from their PayPal account.
Customer returns to the checkout page: The customer is redirected back to the checkout page in your store to review the order.
Customer places order: The customer places the order, and the order information is submitted to PayPal.
PayPal settles the transaction: PayPal receives the order and settles the transaction.
There are two main steps which we need to perform to complete the payment. “Create Order” and then “Capture Order”. The “Create Order” step starts when the customer places order and ends when the customer is redirected back to the checkout page after initiating the transaction on PayPal. Once the order is created the final step is to approve the order which is what “Capture Order” does. The “Capture Order” comprises the last two steps in general in the above-mentioned steps. Below are the resources for your further reading.
Setting up Checkout Flow with JavaScript
Create Order API calls from Server Side
Capture Order API calls from Server Side
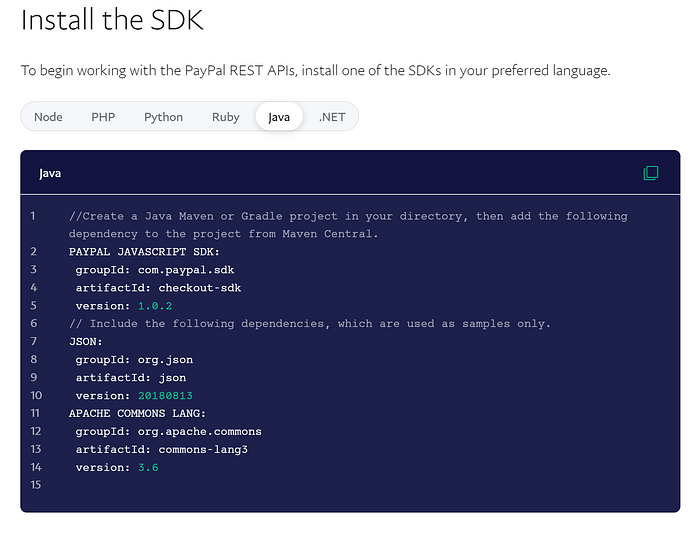
PayPal SDK
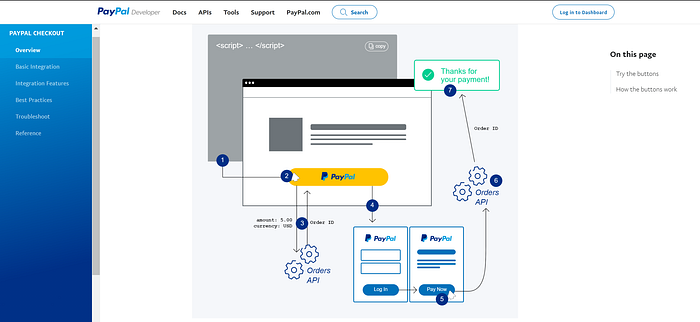
PayPal SDK is present in almost all the major programming languages. For this article I will be using Java SDK. For JavaScript SDK, PayPal has gone one step further and provided us with “Smart Buttons”. The button abstracts lot of stuffs from us, if you look at the image provided on the PayPal documentation, you will see a lot of things happening on click of a single button.
Now let us create a custom plain button and use PayPal Java SDK to perform the exact same task.
Creating Spring Boot Application
To use PayPal Java SDK we will use the maven dependency which we can find from here.
Let us create a spring boot project. I will use Mustache for UI because of the simplicity.
Git Repository for the application
First lets configure your pom.xml or build.gradle file
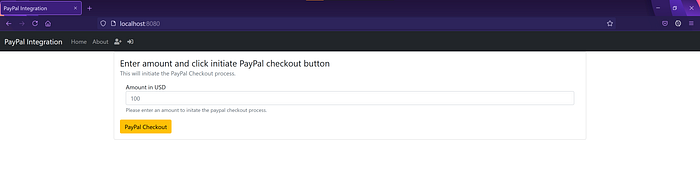
Our application will be dead simple. We will have an index page where user can enter an amount and pay with PayPal to initiate the PayPal checkout process. You can break the “Create Order” & “Capture Order” in two different steps but I will be performing both the requests in one single request.
Let us create an IndexControllerTest.java and write a test case to check if view named index is returned when we perform a GET on “/”. To make it work we will create a IndexController.java, annotate it with Controller and RequestMapping. Let’s add our first test case:
This Unit test will fail and because we have not yet created the view. (I will assume that you are familiar with XP practices like TDD so I will not go into details of it). Let us create a “index.mustache” in template folder and a method in our controller corresponding to GetMapping.
Time to build a raw index page. I will be using Bootstrap for it.
Let’s create a form to submit an amount to mimic the Order total value and we will send this amount value to PayPal APIs via the SDK to create an Order.
Once we have the form ready, we can work on our service layer. Let’s create a Payment Service interface (which also happens to be named as PaymentService.java) and add an implementation as PayPalPaymentService.java.
Our interface should be able to accept the total amount which needs to be sent to Paypal to create an order request and it should also send a url to Paypal so that it can redirect the user to our application once the order is created. Once we execute a create order request using the PayPal SDK, we will get an Order Id back from PayPal along with bunch of URLs that can be used to further perform different actions on the newly created order. For more details on what the actual Order APIs are please refer this link. Order APIs Docks V2.
Once we have the order id generated by PayPal, we can use it to capture the order and complete the payment.
Before I move I forward, it is important to understand the 3 major “Status” of an order.
· CREATED: the first state when the order gets created — Result of “Create Order” operation.
· APPROVED: once the order created, it needs to be approved before the final phase of execution, i.e., “Capture Order”
· COMPLETED: once the payment is processed after the “Capture Order” phase.
Therefore, when we first create an order, it gets into created state and then we need to approve the order before we can complete the order with “Capture Order” operation. Don’t worry when we first create an order, we get a link from PayPal to approve the order as well. We can use that link to approve an order.
There are other statuses in which an order can be, but for the sake of this article we will stick with the above mentioned three statuses.
Create Order
Let’s start with how we can create an order using the PayPal SDK. The PayPal Java Checkout SDK also provides some code snippets on how we can use simple java code to achieve this. But we will leverage the features provided by Spring.
First of all we will write a simple controller method which will accept the form parameter from our UI and us it to create Order. We will also inject the HttpServletRequest into our method so that we can build a return url to which PayPal can redirect us once the order is approved post order creation.
So let us create in OrderController and add few methods to it (I will skipping test cases for now, but in real projects please never deviate from XP practices)
Time to inject the payment service and delegate the order creation creation process to it with two parameters, amount and return url.
CreatedOrder is just a POJO:
Aaarrrggghhh.. I should have used Kotlin for this article. Ok let’s move on.
Our Payment interface now looks something like this:
Time to work on its implementation.
Before we can use the PayPal SDK classes to make the actual API calls we need to instantiate an instance of PayPalHttpClient. To do this we will have to use the Client Id and Secret of the application which created on PayPal. Let’s add a those into our application.yml files. Of course, I will only add the those as placeholders and provide the actual client id and secret while running my application. In real world scenario you should never hardcode any sensitive information in the application configuration files instead they should be pulled from some kind of Vault and provided as command line arguments to your applications. Note: if you are dealing with highly sensitive information, then putting that information inside your app’s memory for a very long time is also considered as a security vulnerability and thus you should avoid keeping sensitive information in memory for long. Time to define those properties in application.yml
Remember to the app now you will will have to provide environment variables to provide the values for “paypal.clientId” and “paypal.secret”.
Its time to make our payment implementation aware of these properties:
Here we have injected the values from our application.yml file to this class and used them to instantiate an instance of PayPalHttpClient. This class will execute the API calls for us later.
Now things are fairly straight forward from here. We first have to create an OrderRequest (if you refer the Order API V2 this the payload to create an order), populate it with required params such as intent(what is the intent of this request), purchase units(for specifying how much money has to be deducted and in which Currency) and application context(for specifying the return url).
Once the payload is formulated (remember SDK provides us POJOs to formulate the actual payload), we create an OrderCreateRequest with the created payload and execute the “Create Order” flow using our PayPal client. From the response we can extract the order entity and pull out the Order ID and approval link for further processing. Remember the order status?
Once the create order method completes, we have an Order ID and link to approve the order so that we can start with the “Capture Order” flow. So back in our controller lets redirect the user to the approval link so that the order gets approved.
Once the request gets redirected to the approve URI, PayPal recognizes the request and approved the associated Order with it and then Redirects the request from PayPal Server to the “Return URL” which we had set in the application context while creating order request. In my case it will http://localhost:8080/orders/capture and spring will automatically invoke the mapped controller method for that url mapping. One important thing to keep in mind here is that, when PayPal redirects the request to the “Return URL” after the order is approved, it sends the order id as request param with key name of “token” therefore we will capture that param in our controller method and use that order id to complete the order by executing the “Capture Order” flow.
I am using the order id here to put it in the model so that it can be displayed in the Order page.
Over to the captureOrder implementation. It can not get more simpler than this.
Yes, the method is defined in the Payment Interface.
We create an OrdersCaptureRequest by passing the orderId to its constructor and use our paypal client to execute the request.
Now that we have everything set lets test our application. Shall We?
Testing the Payment
Let’s use an amount of 500 USD
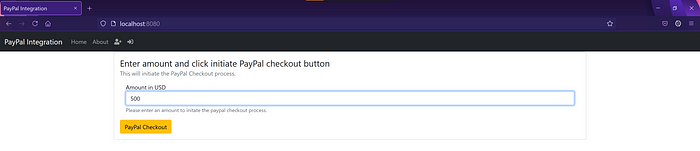
Time to click the checkout:
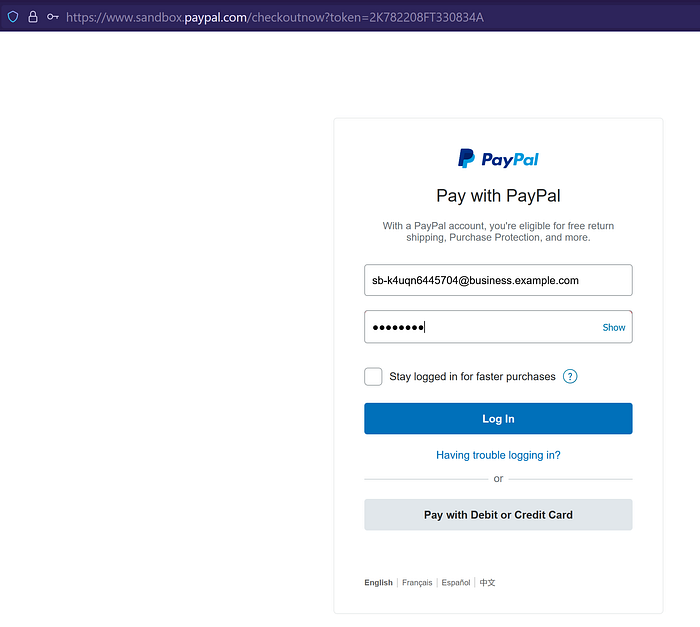
Let’s provide the credentials of the test user which we created (remember John Doe, the use which PayPal created for us with bunch of autogenerated values. Yeah that Guy.)
After clicking on Log in We will be redirected to PayPal web page
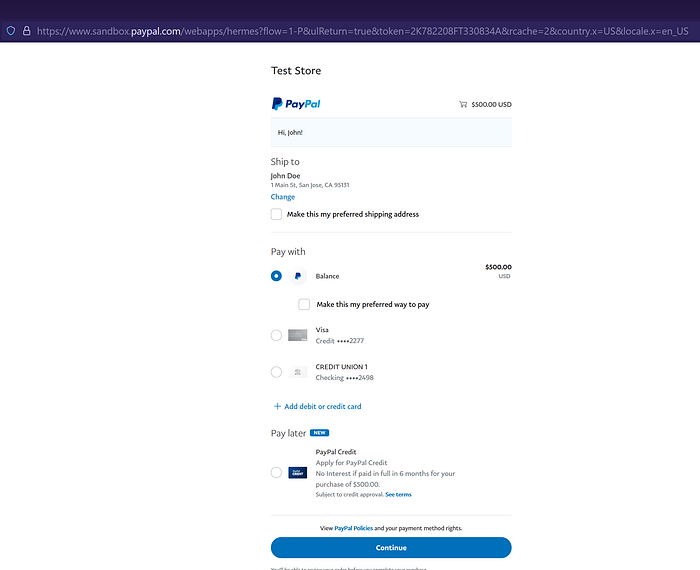
On this page user could choose to select a shipping address or may choose to use different payment methods but we will stick with the PayPal balance and will hit continue.
And after everything is done we are redirected to the orders page to view the order id
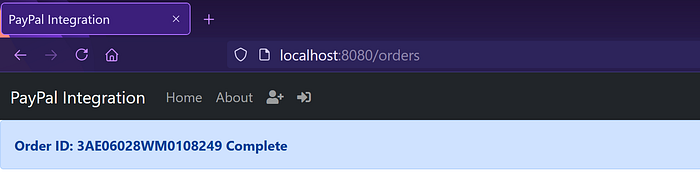
Yes, you can design a wonderful page but I just wanted to demonstrate the overall flow.
It is also advisable to write some Aspects to log order details into some kind of backend store for audit purpose.
So, this is it guys. If you need to learn how to integrate Paypal with Single Page Applications like do let me know. And feedback is much appreciated. If you think something can be improved.