User Interface in Unity-Mini Map
Creating a Mini-Map Using UI Elements
If you’ve been following along through all of the User Interface in Unity segments, we’ve touched base on a lot of foundational things that are used with Unity’s UI System. In this section, we’re going to put that knowledge to the test and create a Mini-Map.
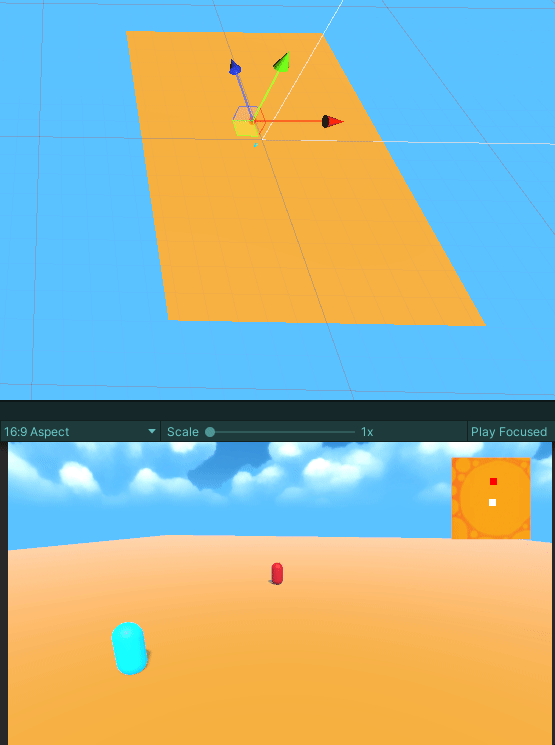
In my scene, I’ve created a plane and placed two capsules in the scene to represent a Player and an Enemy. I also placed in a new skybox because I get tired of looking at the default skybox.

Next, I took one of the icons from the Sprite Sheet we accessed, masked it with a duplicated image, and used the Rect Mask 2D Component to adjust the edges to my liking.

Lastly, I placed two UI Images and changed the color of one of them to red to represent the enemy. Note that this is anchored to the right corner of the canvas, and all the elements for the Mini Map are placed within an Empty Object contained within the canvas.

With the environment staged, it’s time to implement the Mini-Map Behavior. Let’s create a new script for the Mini-Map. Additionally, let’s add an Empty Object to the scene to act as a manager for our script.
First, we need to access Unity’s UI library.

From here, we want to grab the Player position, Enemy position, Map position, and the image of the Enemy. Also, we want the Image of the Enemy to be a child of the Image map.

Let’s access the required objects in our script using [SerializeField] and place them within the manager in the Inspector.

Our next step will be to connect our map position to the player position because the Player will always be set to the center of the mini-map.

Since we don’t want to access the Y-axis on our map for the player, we’ll set the Y as the Z position.

With the game running, we can move our player around and you’ll see that the Player doesn’t move and the map positions itself according to where the Player is. The map we created through a mask allows us to reveal the rest of the map as the Player ventures through it.
From here, the map has the appearance of running at inverted values so let’s multiply the position by -1 to correct the issue.


Let’s work on the Enemy now. The Enemy will work the same way as the player but we’ll use the enemy position instead of the map position.

And that’s how we make a Mini-map using Unity’s UI!
See you at the next one!